I installed the following software versions:
VirtualBox 6.1
Alpine 3.14
I have deployed Alpine as a virtual machine in VirtualBox, that step takes a little more time but is fast. So it’s necessary to define the network configuration of Alpine, take into account the NAT and DHCP server needs to have an assigned static IP so, on that regard I edited this file /etc/network/interfaces like this:
auto eth0
iface eth0 inet dhcp

auto eth1
iface eth1 inet static
address 192.168.201.2
netmask 255.255.255.0
eth0 represents the public network. The NAT network is assigned by VirtualBox host.
eth1 represents the private network. I created a new Host Network address/mask in VirtualBox’s Host Network Manager with disabled DHCP server. The address/mask was 192.168.201.1/24
The host name or the server name for this virtual machine was assigned editing the following files:
vi /etc/hostname:
alpine-nat
vi /etc/hosts
127.0.0.1          localhost.localdomain  localhost
::1                     localhost.localdomain  localhost
192.168.201.2  alpine-nat.mplb.localnet alpine-nat
After that reboot your virtual machine.
Activates additional repositories for Alpine’s apk command.
Edit this file:
vi /etc/apk/repositories

After that executes the commands:
apk update
Installs IPTABLES with NAT configuration
Follows the following commands in bash:
apk add iptables
rc-update add iptables

echo "net.ipv4.ip_forward = 1" >> /etc/sysctl.conf
sysctl -p

#eth0 is the PUBLIC_NET
#eth1 is the PRIVATE_NET

iptables -t nat -A POSTROUTING -o eth0 -j MASQUERADE
iptables -A FORWARD -i eth0 -o eth1 -m state --state RELATED,ESTABLISHED -j ACCEPT
iptables -A FORWARD -i eth1 -o eth0 -j ACCEPT

/etc/init.d/iptables save
/etc/init.d/iptables restart
Installs DNS/DHCP server in Alpine
I am going to install dnsmasq server, that provides dns and dhcp functionalities, so executes this command:
apk add –no-cache –virtual=run-deps dnsmasq
Edit or create the following files:
vi /etc/dnsmasq.d/01-base.conf
domain-needed
bogus-priv
no-resolv
expand-hosts
vi /etc/dnsmasq.d/02-nameservers.conf
server=8.8.8.8
server=8.8.4.4
vi /etc/dnsmasq.d/03-localresolv.conf
local=/mplb.localnet/
#eth1 PRIVATE_NET
interface=eth1
listen-address=::1,127.0.0.1
domain=mplb.localnet
vi /etc/dnsmasq.d/04-dhcp.conf
dhcp-range=192.168.201.100,192.168.201.200,24h
dhcp-authoritative
dhcp-leasefile=/var/lib/dnsmasq/dnsmasq.leases
dhcp-host=alpine-master
dhcp-host=alpine-node01
dhcp-host=alpine-node02
The hosts alpine-master, alpine-node01 and alpine-node02 are servers or workstations of the network and need to have the domain name set up as mplb.localnet besides theses hosts are going to have an static IP assigned by the DHCP server.
Then, it executes this sequence of commands:
chmod 0775 /etc/dnsmasq.d
chmod 0664 /etc/dnsmasq.d/*
sudo dnsmasq --test
mkdir /var/lib/dnsmasq/
/etc/init.d/dnsmasq stop
If you want to execute the dnsmasq server in test mode you can edit this command:
sudo dnsmasq --no-daemon --log-queries
Otherwise:
/etc/init.d/dnsmasq start
Setting up shared folder in Virtualbox for Alpine 3.14
Executes this sequence of commands:
sudo apk add virtualbox-guest-additions
sudo rc-update add virtualbox-guest-additions default
sudo echo vboxpci >> /etc/modules
sudo echo vboxdrv >> /etc/modules
sudo echo vboxnetflt >> /etc/modules
sudo apk update
sudo apk upgrade --update-cache --available
sudo reboot
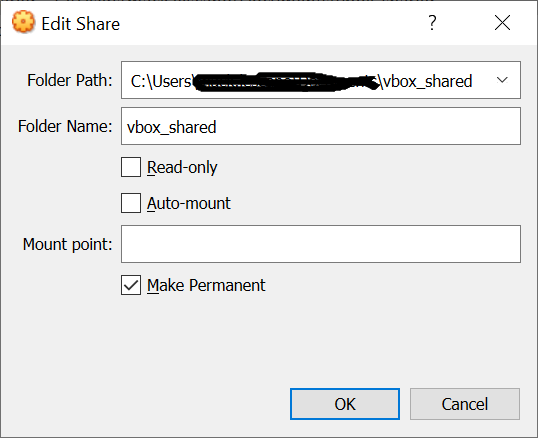
Before to mount, it's needed to configure a shared folder in Virtualbox like this:
Then:
sudo modprobe -a vboxsf
sudo mkdir /mnt/vbox_shared
sudo mount -t vboxsf vbox_shared /mnt/vbox_shared